Gelcoat Repair on Fiberglass Boats — How to Fix Chips, Cracks, and Blisters
Gelcoat repair has gotten complicated with all the contradictory advice flying around. As someone who ran a small detailing operation out of my garage for four years, I learned everything there is to know about fixing fiberglass hulls the hard way — on my own 1987 Bayliner Capri, on a friend’s Sea Ray that kissed a dock at exactly the wrong angle, and on maybe a dozen other boats in between. Some of those repairs are genuinely invisible. Some still haunt me. The disasters taught me more than the clean jobs ever did, which is why this article exists.
This isn’t a product page dressed up as advice. I’m walking you through what I actually do — embarrassing mistakes included, because those are the parts that matter.
Assessing the Damage — Chip vs Crack vs Blister
Not all gelcoat damage is the same. Treating a blister like a chip is a reliable way to blow a Saturday and about $40 in materials. Spend five minutes actually looking at what you’re dealing with before you buy a single thing.
Chips and Gouges
A chip is missing material — something struck the hull or deck and removed a chunk of gelcoat, sometimes all the way down to the fiberglass laminate underneath. If you can see woven glass fiber or a yellowish resin layer at the bottom of the damage, you’ve gone through the gelcoat entirely. These are fully DIY-able. Standard gelcoat paste, done correctly, handles chips well.
Cracks — Stress vs Crazing
Here’s where it gets more complicated. A single crack running in one direction across the hull is usually an impact crack — the boat flexed, the gelcoat didn’t. Fill it, done. But what is crazing? In essence, it’s a spiderweb of tiny cracks covering an area. But it’s much more than surface damage — it usually means the gelcoat has hardened with age to the point where normal hull flexing fractures the surface. You can fill crazing. It will come back. Badly crazed sections often need to be ground out entirely and resprayed — that’s a job for a professional or someone with spray equipment and real patience.
One quick test: press firmly on the crazed area with your thumb. Noticeable flex means the underlying laminate may be soft or delaminated. Don’t DIY that. Get a marine surveyor involved before you touch anything else.
Blisters
Blisters show up below the waterline — they’re a water intrusion problem. Small ones, under about 10mm, can be ground out, dried completely, and filled with epoxy fairing compound and gelcoat. Larger blistering covering significant hull area is a different animal — osmotic blistering — and involves barrier coating, not cosmetic repair. Peel the skin off a large blister and smell it. Vinegar or solvent smell means osmotic damage. You need to fix the cause, not just the surface.
Tools and Materials You Need — Specific Products
Probably should have opened with this section, honestly. Nothing kills momentum on a repair day like discovering you’re missing something halfway through. Here’s exactly what I keep on hand.
Gelcoat Paste
I use TotalBoat Thixo Gelcoat for most repairs. It comes in several base colors, tintable, and a 1-quart kit runs about $45–$55 with hardener included. A little goes a long way for small chips — I’ve run 20+ repairs off a single quart. For white boats and occasional use, the Evercoat Boat Armor Gelcoat Repair Kit (around $18 at West Marine) works fine as a budget option.
Hardener (MEKP)
Methyl ethyl ketone peroxide — it comes with the kit, but if you’re buying bulk gelcoat you’ll source it separately. Standard mix ratio is 1–2% by volume. Use a graduated dropper or syringe. Not a guess. Too little hardener and the repair stays tacky indefinitely. Too much and it cures fast and brittle — I’ve done both, and neither is fun to fix.
Sandpaper — The Full Progression
This is where people cut corners and regret it. Don’t make my mistake. You need:
- 220-grit — initial surface prep and shaping the repair area
- 400-grit — first wet sand after cure
- 600-grit — wet sand
- 800-grit — wet sand
- 1000-grit — wet sand
- 1500-grit — wet sand
- 2000-grit — final wet sand before polish
I buy Mirka or 3M wet/dry sheets in bulk off Amazon — 50-sheet packs run about $8–$12 per grit. You will use more than you expect. Stock extra 400 and 600 specifically.
Polishing Compounds
Meguiar’s M100 Mirror Glaze Pro Cut Compound followed by Meguiar’s M205 Ultra Finishing Polish — that’s the two-step I use after sanding. Apply with a 6-inch dual-action polisher. I’ve been running a Porter-Cable 7424XP for eight years — same machine, still works. For small spots, a foam applicator pad by hand does the job.
Everything Else
- Plastic mixing cups — graduated ones, not disposable coffee cups
- Wooden stir sticks or plastic spreaders
- Acetone for surface cleaning — not MEK, not lacquer thinner, acetone
- Blue painter’s tape — 3M 2090 ScotchBlue specifically, the original formulation; cheap tape bleeds and you’ll hate yourself
- PVA mold release film spray — goes over fresh gelcoat so the surface cures properly instead of staying tacky
- Nitrile gloves, safety glasses, and actual ventilation
Step-by-Step Gelcoat Chip Repair
Temperature matters more than most tutorials admit. Gelcoat cures by chemical reaction — that reaction slows dramatically below 60°F. Work in 65–85°F when you can. Direct hot sun heats the hull surface above ambient air temperature and eats your working time fast. I learned this on a black-hulled boat on a July afternoon in Florida — the gelcoat started kicking in about four minutes and I wasn’t close to finished. It was not a good day.
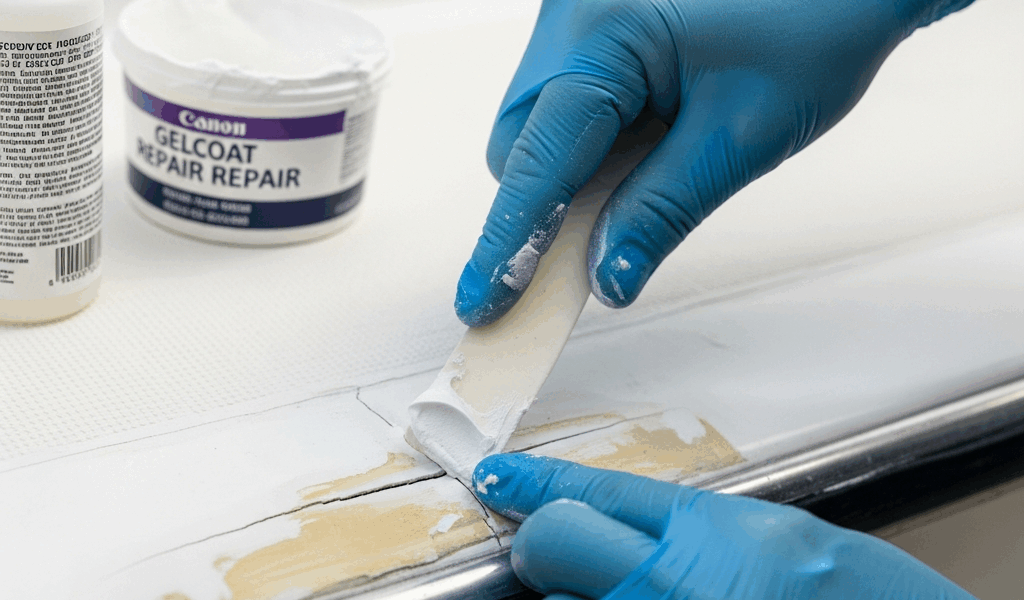
Step 1 — Clean and Prep the Damage
Wipe the entire repair area with acetone on a clean rag. Let it flash off completely — about two minutes. Inspect for loose gelcoat edges and remove them with a razor blade or dental pick. You want clean, hard edges, not flaking margins. Roughen the bottom of the chip with 220-grit to give the new gelcoat something to grip, then wipe with acetone again. Tape off the surrounding area with blue tape, leaving roughly 3mm of border around the damage.
Step 2 — Mix the Gelcoat
Mix only what you’ll use in ten minutes. For a small chip, that’s maybe 5–10ml of paste. Add 1% MEKP at 70°F, up to 2% if it’s cooler. Mix slowly — scrape the sides and bottom of the cup — for about 90 seconds. Inconsistent mixing leaves soft spots in the cured repair, and you won’t know until you’re sanding.
Step 3 — Apply
Slightly overfill the chip. Gelcoat shrinks marginally as it cures, and you need material to sand back. Use a plastic spreader to push it in firmly, working out air bubbles. Get the surface as smooth as you can — every bit of texture you leave now is sanding time later. Spray or brush a thin coat of PVA over the repair immediately after. PVA blocks oxygen, which otherwise inhibits the surface cure and leaves it tacky.
Step 4 — Cure
Leave it alone. At 75°F, gelcoat is hard enough to sand in roughly 2–4 hours. Overnight is better if your schedule allows. Pulling tape too early disturbs the edges. Cured gelcoat feels hard and won’t compress under fingernail pressure — that’s your test.
Step 5 — Sand and Polish
Remove the PVA film with water and a rag, then start with 400-grit wet, using a flat sanding block — not your fingers — to level the repair flush with the surrounding surface. Work through 600, 800, 1000, 1500, and 2000. Keep everything wet. Scratches left from 400 that aren’t fully removed at 600 will show through polish. After 2000, compound and polish as above. The repair should disappear under good light — if you can still see it, go back to 1000 and work through the sequence again.
Color Matching — The Hardest Part
I’ll be direct: color matching old gelcoat is genuinely hard, and anyone who tells you otherwise is selling something. New gelcoat does not match weathered gelcoat. White boats have yellowed. Blue boats have faded. What you mix will be the color the boat was in 1994, not what it looks like sitting in a slip right now.
Start With the Manufacturer Color Code
Most manufacturers used specific gelcoat color codes — Bayliner, Sea Ray, MasterCraft, Chaparral all have documented specs. Check the transom or inside a hatch for a manufacturer plate with a hull color code. TotalBoat, Fibre-Glast, and US Composites can mix to those codes. Call them directly. The website won’t get you as far as a conversation with someone in the formulation department.
Why You Need a Test Patch
Even with the right color code, mix a test batch and apply it somewhere inconspicuous — inside a cockpit locker, on the underside of a gunwale. Let it cure fully. A color that looks close while wet often looks nothing like the surrounding hull once it’s hard and polished. You need to see the cured, polished result in the same light as the rest of the boat before committing to a repair on a visible panel. That’s what makes test patches endearing to us DIY repair people — they’re the step that actually saves the job.
The Reality of Old Gelcoat
Frustrated by a repair that kept reading lighter than the surrounding hull despite matching the manufacturer code exactly, I eventually figured out a workaround — tinting the gelcoat slightly warm by adding a small amount of yellow oxide tint paste to account for age-yellowing in the original surface. This is not exact science. It’s trial and error across multiple test patches. Budget time for it. On a boat more than ten years old, I’ll often run four or five test patches before I’m satisfied. On heavily oxidized hulls, the best move sometimes involves repairing with approximate color and then compounding and polishing the entire panel — knocking down oxidation lightens the surrounding gelcoat toward new, which closes the gap between it and the repair.
Common Mistakes That Make Your Repair Visible
Every one of these has made a repair worse than the original damage at some point. Speaking from experience — and from watching other people make the same calls.
Overfilling and Under-Sanding
Overfilling is correct — you need excess material to work back. The mistake is stopping too soon. A repair that sits proud of the surrounding surface by even 0.5mm catches light differently at every angle. Use a straightedge or your fingernail across the repair to check for high spots. If you can feel it, light can find it.
Skipping Grits
Going from 400 directly to 1500 does not save time. It leaves scratches that polishing compound can’t fully remove — they diffuse light and the repair looks hazy instead of glossy. Work every grit in sequence. This is not optional and there are no shortcuts that actually work.
Rushing the Cure
Sanding under-cured gelcoat is a disaster — it gums up sandpaper and tears the surface instead of cutting it. The repair ends up rough and porous. When in doubt, wait. The extra hours are worth it every single time.
Gloss Level Mismatch
This one catches people off guard. If the surrounding hull has oxidized to a 60% gloss and your repair is polished to a mirror 95%, the repair will be more visible than the original chip — even if the color matches perfectly. Step back after polishing and compare gloss levels in raking light. If your repair is too shiny, a final 2000-grit pass without compound, or a finishing polish skipping the machine buff, will knock it back. Match the gloss, not just the color.
Not Cleaning With Acetone Before Application
Wax contamination on the surrounding gelcoat prevents adhesion at the repair edges. A repair that looks perfect on day one can pop loose at the margin after a season on the water. Acetone the prep area thoroughly — and make sure any wax you’ve used on the hull is completely gone from the repair zone before you mix anything.
Gelcoat repair rewards patience over speed. My first repair took three hours and looked terrible. The most recent one took most of a Saturday — test patches and all — and I have to look very carefully in specific light to find it now. The process doesn’t really change. Your eye for what’s right just gets sharper.


Stay in the loop
Get the latest nautical soundings updates delivered to your inbox.