How to Tell Your Outboard Is Actually Overheating
Outboard overheating has gotten complicated with all the conflicting advice flying around. Shut it down immediately. Nurse it back slowly. Check this first, check that first. Meanwhile you’re sitting dead in the water, alarm screaming, trying to remember what some guy on a forum said three winters ago.
As someone who has limped a 115-horse Yamaha back to a ramp on a July afternoon — sweating, second-guessing every decision — I learned everything there is to know about reading an overheating outboard the hard way. Today, I will share it all with you.
So, without further ado, let’s dive in.
Here’s what genuine overheating actually looks like. The warning horn blares — that high-pitched, insistent tone nobody forgets after hearing it once. Your temperature gauge climbs past the normal band into red territory. White or gray vapor rises from around the powerhead. The engine loses power, runs rough, maybe smells like something burning. These things happen fast and sometimes all at once.
But what is a low-water alarm? In essence, it’s a warning that cooling water isn’t circulating properly. But it’s much more than that — it’s not automatically a full overheat. The engine may not have cooked yet. That distinction matters enormously, because your next move depends entirely on which situation you’re actually in.
Temperature spike plus alarm? Shut it down. Not at the dock. Right now. Running an overheated outboard for even four or five additional minutes can score cylinder walls, blow a head gasket, or warp the powerhead. That’s a $2,000 to $8,000 repair bill instead of a $400 impeller replacement. Don’t make my mistake.
Once the engine cools — give it 20 minutes minimum, completely, not “probably cool enough” — you can start investigating. Most people skip straight to calling a shop. You might not have to.
Check the Tell-Tale Stream First
Probably should have opened with this section, honestly.
Before pulling anything apart, find the tell-tale. It’s a small fitting — usually clear plastic tubing — that runs water overboard as visible proof that cooling water is actually circulating. Some boaters call it the pee hole. On most outboards, it sits low on the powerhead or along the cowling side, and it should push out a steady stream whenever the engine runs at operating temperature.
That stream is your first real diagnostic tool. A normal tell-tale stream is steady, roughly pencil-lead wide, cool to the touch, and runs clear or slightly opaque depending on your water. When you shut down, flow stops within a few seconds. Simple.
Weak or absent tell-tale? Your cooling system isn’t moving water. That information alone tells you something downstream is blocked or broken. Steam actually coming from the tell-tale itself means the water inside has boiled — that’s extreme overheating, and the engine needs to sit, not run.
Start with the simplest possible fix: a clogged tell-tale passage. Salt crystallization, sediment, and debris build up inside that small opening constantly — especially on motors run in saltwater without regular flushing afterward. Grab a straightened paperclip or thin wire and carefully work it through the opening. Don’t force it hard. A toothpick handles soft clogs fine. Flush the passage with fresh water from a garden hose if you can reach it safely.
Run the engine again. Stream back to normal, engine temperature dropping? You solved it for free in ten minutes. So many boaters panic and trailer straight to the shop for a $150 cleaning job that takes a technician about as long as it took you to read this paragraph. That’s what makes the tell-tale check endearing to us DIY boaters — it costs nothing and catches a huge percentage of “overheating” problems before they become actual overheating problems.
Still weak or dry after clearing? The problem lives deeper in the cooling system.
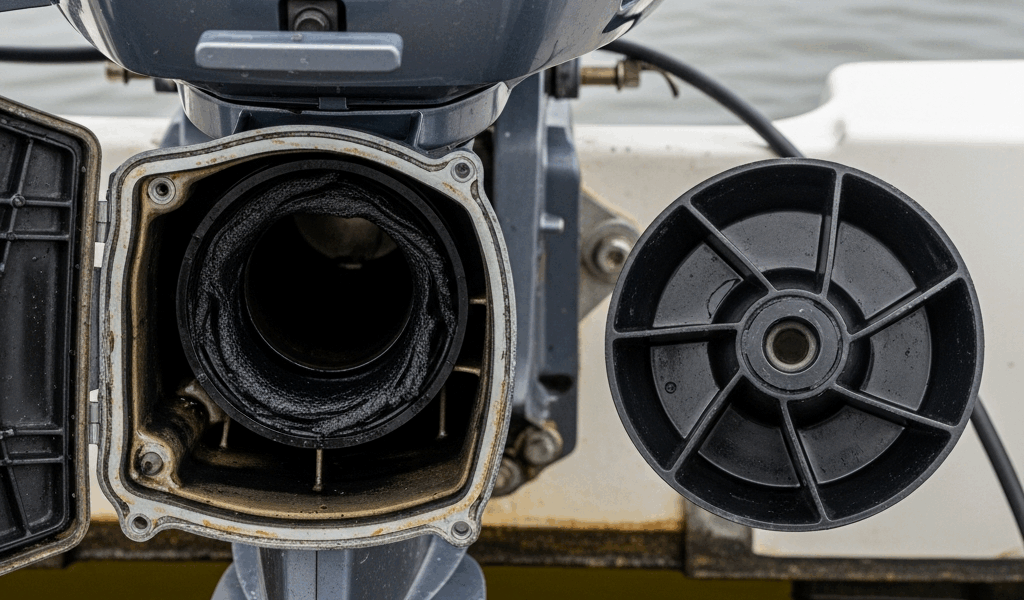
Water Pump Impeller — The Most Likely Culprit
The impeller is a rubber wheel with curved blades inside your water pump housing — typically located in the lower unit. It spins and physically pushes water up through the cooling passages. When it wears out, cooling stops. Almost entirely. This single component is responsible for the majority of outboard overheating cases I’ve encountered.
But what is impeller wear, really? In essence, it’s the rubber breaking down from heat cycling, age, and running dry even briefly. But it’s much more than gradual wear — impellers can fail suddenly, dropping chunks of rubber into your cooling passages and creating a secondary blockage problem on top of the original failure.
Impellers typically last three to five years. How often you run the motor, what water you run it in, and whether you flush with fresh water after saltwater use all affect that timeline dramatically. Check your owner’s manual — some manufacturers specify replacement every 300 operating hours rather than calendar years. My old Suzuki DF90 called for 200 hours. I’m apparently someone who ignored that spec, and the Suzuki impeller never let me forget it.
Failing impellers show specific symptoms. Tell-tale weak or absent. Engine overheats under load but runs okay at idle — that’s a classic partial-failure sign. You might also notice the water intake grate on the lower unit, near the prop, packed with weeds or grass. That’s not always the impeller’s fault. Often it’s just a blocked intake. But the two problems appear together regularly enough that clearing the intake first makes sense.
Tilt the motor up. Look at the grate. Pull away debris by hand, wipe it clean, run the engine again. Sometimes that’s all it takes — total time, maybe three minutes.
Intake clear and the tell-tale still dry? The impeller is likely worn. Pull the lower unit — YouTube is genuinely useful here, and searching your specific model usually surfaces a walkthrough shot on someone’s actual dock, not a studio. Inside the water pump housing, you’ll find the impeller. A healthy one is flexible, slightly shiny, blades clearly defined. A worn impeller looks flat, cracked, discolored, or has missing chunks. Some just feel hard and gray instead of pliable. That hardness alone is enough to cause failure.
Replacing an impeller yourself is realistic on many outboards if you’re mechanically comfortable. You’ll need basic wrenches, a gasket scraper, and a new impeller kit — typically $50 to $150 depending on the motor. A marine mechanic charges $300 to $600 in labor for this job. The math is obvious.
That said — the gaskets matter. You cannot reuse them. They have to seal correctly or you’ll have worse problems than overheating. If you’ve never opened a lower unit, this might not be your first solo adventure. No shame in calling a technician for this one specifically.
Thermostat and Cooling Passages — If the Impeller Checks Out
Frustrated by a thermostat that looked perfectly fine sitting on a workbench, a friend of mine spent two weekends chasing an overheating problem on his 2019 Mercury 90 using a cheap candy thermometer and a dollar-store pot. Turns out the thermostat was opening four degrees too late and holding coolant flow back under hard acceleration. Forty-five dollar part. This new diagnostic trick took off among our group and eventually evolved into the standard first-check that enthusiasts know and swear by today.
Your outboard’s thermostat regulates engine temperature by controlling water flow through the cooling jacket. When it sticks closed, heat builds inside the powerhead even though water circulates elsewhere. The tell-tale might look completely normal. The engine still runs hot.
Testing is straightforward — remove the thermostat (your manual shows the location), drop it into a pot of water on the stove, and watch it with a thermometer. It should stay closed in cool water and open at a specific temperature, typically 140°F to 160°F depending on the engine. Doesn’t open as water heats? Stuck closed. Replace it. A new thermostat runs $40 to $80.
While you’re thinking about cooling passages, consider salt and mineral buildup — especially if your motor runs primarily in saltwater or brackish conditions without regular post-use flushing. Over years, calcium deposits accumulate inside the cooling jacket and restrict water flow progressively. You won’t notice it immediately. Then one August afternoon you will notice it all at once.
The fix is a proper flushing procedure. Run the motor on a flush kit — a device that attaches to your lower unit intake and connects to a garden hose — for 10 to 15 minutes using a water-soluble descaling solution designed for marine engines. Products like Salt-Away or Star Brite Salt Remover work well here. Do this every season if you run saltwater. Skipping it for three or four years turns into an expensive shop flush or cooling passage cleaning that runs $200 to $400 before they find anything else wrong.
When to Stop Diagnosing and Call a Marine Technician
Some problems sit well outside driveway troubleshooting territory. Know your limits — honestly. There’s no failure involved in calling a professional.
While you won’t need a machine shop in your garage, you will need a handful of specific red flags to recognize when DIY stops being smart. Stop diagnosing and reach for your phone when you see any of these.
Your oil looks milky or foamy. That signals head gasket failure — coolant mixing with oil. That’s a shop job, full stop. Actual smoke — not steam, smoke, especially blue or gray — coming from the engine. The engine keeps overheating after you’ve replaced the impeller and tested the thermostat. You’ve pulled the lower unit and found scored cylinder walls — visible gouges or scratches inside the cylinder bore when you look with a flashlight. Any of these mean internal engine damage that requires machine shop equipment and real expertise.
A qualified marine technician might be the best option here, as internal engine repair requires precision equipment and trained diagnostic judgment. That is because cooling system failures that go unaddressed long enough don’t stop at the impeller — they migrate upward into the powerhead and turn a $400 repair into a $3,500 rebuild. Labor alone on serious powerhead work runs $1,500 to $3,500 minimum. Parts stack on top of that. This isn’t a hand-tool job in a home garage.
A good technician brings the right tools, manufacturer-level diagnostic equipment, parts access, and warranty backing if something goes sideways post-repair. That combination has real value — value that’s difficult to put a number on until you’ve needed it.
Calling a pro isn’t giving up. It’s recognizing exactly where the line sits between preventive maintenance and engine overhaul — and staying on the right side of it.


Stay in the loop
Get the latest nautical soundings updates delivered to your inbox.