Why Outboards Sit Fine and Then Refuse to Start
Outboard troubleshooting has gotten complicated with all the conflicting advice flying around. As someone who has winterized and revived boats for years, I learned everything there is to know about why these engines go stubborn after sitting cold for months. Today, I will share it all with you.
But what is a winter no-start, really? In essence, it’s chemistry conspiring against you while the engine just sat there looking innocent. But it’s much more than that.
Here’s the actual problem: fuel sat inside the carburetor and lines for three, four, sometimes six months. Ethanol-blended gas degrades faster than most people realize — especially cold and stagnant. It oxidizes. It thickens. Eventually it turns into varnish that gums up needle seats and jets, creating blockages too small to see but large enough to kill fuel flow entirely.
Meanwhile, the rubber seals throughout your fuel system dried out. The primer bulb developed internal cracks. The fuel/water separator collected moisture that turned acidic. Metal surfaces corroded. Gaskets lost their integrity. That’s why the engine cranks just fine — the starter motor has no opinion about fuel or compression — but fires absolutely nothing.
Most winter no-starts live in the fuel system. I’ve watched mechanics tear into ignition systems and compression assemblies while a $15 fuel filter or a squeezed primer bulb would have cracked it in ninety seconds. Probably should have opened with this section, honestly.
Start With the Fuel System — This Is Almost Always the Problem
Don’t guess. Don’t fall into a YouTube spiral. Start here. So, without further ado, let’s dive in.
Check your fuel. Pop the cap. Smell it. Fresh gasoline has a sharp, almost aggressive smell. Old fuel smells stale — closer to paint thinner or varnish. If it smells off, drain the tank completely. Old fuel goes in a hazmat container, not down a drain. Refill with fresh 87-octane and add a stabilizer like Sta-Bil Marine or Star Tron at the recommended ratio. Ethanol-free fuel is genuinely better for winter storage next time around, though treated regular fuel works if you’re disciplined about it.
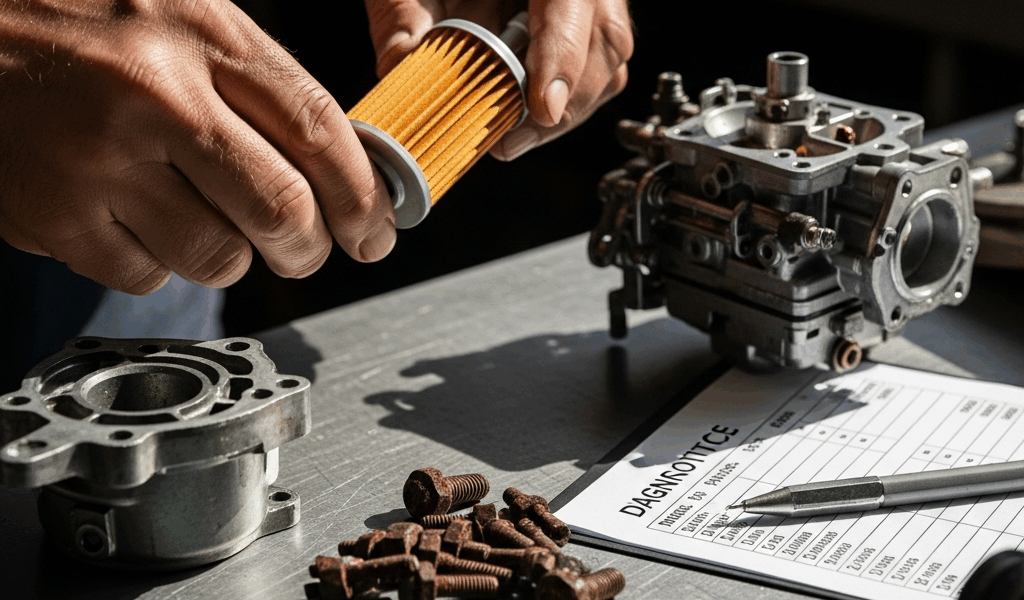
Inspect the primer bulb. Find it on the fuel line between the tank and engine — the soft rubber squeeze ball you’ve probably ignored for two seasons. Press it hard with your thumb. A healthy bulb resists firmly and springs back. A dead one feels mushy, hollow, or cracks under real pressure. Squeeze it ten times before you attempt a start. Each squeeze should build more resistance as the fuel chambers fill. If it stays soft and squishy the entire time, the internal check valve failed — fuel is bleeding backward into the tank. Replace it. They run $8 to $25 depending on brand, and I’m apparently someone who buys the $22 Sierra version because the generic ones never seemed to hold pressure quite right. Don’t make my mistake with the cheap ones on a 70HP engine.
Check the fuel/water separator. This sits between the tank and carburetor on most outboards. Loosen the drain plug at the bottom — keep a rag under it, fuel will drip. Water accumulates here over winter and shows up as cloudiness or a distinct separated layer sitting at the bottom. You want clear, clean fuel. Yamaha, Mercury, and Honda all run slightly different separator designs, but the principle is identical across all three — drain, inspect, replace the element if it’s discolored or swollen. New filter elements run $10 to $30.
Prime the engine by squeezing the bulb until it’s completely firm, then crank it. Many motors fire right here. That’s what makes this step endearing to us DIY boaters — the fix costs nothing except two minutes of squeezing.
Check the Spark Plugs Before You Touch Anything Else Electrical
Frustrated by repeated no-starts and zero useful error codes, I started pulling plugs on every dead engine I encountered — using nothing more than a $12 socket set from the hardware store. That habit changed everything.
Remove the spark plugs. You’ll need a spark plug socket — typically 13/16″ for four-stroke outboards, 5/8″ for certain two-strokes. Honda BF25 through BF225 engines use the 13/16″. Mercury 15HP through 60HP runs the same. Yamaha F9.9 through F225 varies slightly, so check the owner’s manual before you crack the socket set open. Remove one plug and examine the electrode and ceramic insulator closely.
Read what the plug tells you. Black, sooty deposits mean the engine ran rich or sat with fuel leaking into the combustion chamber — extremely common after winter storage. The degraded fuel didn’t ignite cleanly and left carbon behind. White or light gray ceramic means the plug fired cleanly at some point in its life. A wet electrode covered in fuel means spark is weak or missing entirely. Dry ceramic with a chalky white coating means no fuel ever reached that cylinder at all. Each reading points somewhere specific.
Test for spark without expensive equipment. Reinstall one plug into the plug wire. Lay the threaded base against the engine block — anywhere metal grounds it. Have someone crank while you watch the electrode gap. A healthy spark jumps as a bright blue or white flash. Visible and sharp. Weak spark looks orange-ish and lazy. No visible spark at all means the coil, CDI unit, or magneto needs attention — and that’s shop territory.
Gap new plugs to factory spec, usually 0.028″ to 0.032″ for most outboards. NGK BPR6ES plugs cover a surprising number of applications and cost about $4 apiece. Install fresh ones, torque them properly, and most winter starts succeed once fuel actually reaches the combustion chamber.
If It Cranks But Won’t Fire, Check the Carburetor or VST
Fresh fuel confirmed. Primer bulb firms up correctly. Plugs spark clean and blue. Motor still refuses to catch. The carburetor or fuel delivery system is starved — something downstream isn’t moving fuel where it needs to go.
For carbureted outboards — most models built before 2010 — spray one short shot of starting fluid into the intake while someone cranks. One second. Maybe two. If the motor coughs, sputters, or fires briefly before dying, fuel isn’t reaching the combustion chamber. The needle seats inside the carburetor are stuck closed with varnish. A rebuild kit runs $20 to $60 and includes fresh gaskets, seals, and needle valves. Soak the carb body in Gunk Carburetor Cleaner overnight — the quart dip-and-wash cans work best — then gently clear each jet and passage with a thin wire. Many DIYers handle this successfully on a Saturday morning. If pulling the carburetor makes you nervous, a marine technician rebuild typically runs $150 to $300 per carb.
For EFI outboards — fuel-injected models that became mainstream around 2015 — check the vapor separator tank, or VST. Mercury, Yamaha, and Honda all use VSTs to prevent fuel from boiling in the engine bay. The fuel pump inside draws from the main tank and pressurizes fuel to the injectors. A failing VST pump won’t build pressure, and the injectors stay dormant. Turn the key to the “on” position without cranking and listen for a brief electric whirr from the VST area. Two to three seconds of hum means the pump primed. Silence means no fuel pressure. This one needs a shop visit — VST or fuel pump replacement runs $400 to $900 depending on engine brand and model year.
When to Call It and Take It to a Marine Technician
Compression loss, blown head gaskets, and internal corrosion are the hard limits. Know them before you spend another weekend frustrated on the dock.
If fuel flows, plugs spark, and the carburetor has been cleaned — but the motor still won’t catch — compression is likely the problem. Water intrusion during storage corrodes piston rings and cylinder walls quietly, invisibly. A wet compression test versus a dry test can reveal this, though the equipment and interpretation exceed most dockside setups. A marine technician reads results in PSI — healthy outboards typically show 90 PSI or better per cylinder. Below 70 PSI points toward internal damage that no amount of fuel system cleaning will fix.
Blown head gaskets let fuel leak past the gasket into the crankcase, contaminating the oil and destroying lubrication. Pull the oil dipstick and smell it. Raw fuel smell in the crankcase oil is distinctive and alarming. Head gasket replacement means pulling the cylinder head — that requires a lift, gasket scraper, new head bolts, and torque-wrench precision at specific foot-pound specs. This is not a driveway repair.
While you won’t need a full machine shop, you will need a handful of specialized tools and real mechanical experience to go deeper than fuel and spark. First, you should be honest with yourself about where your skills end — at least if you want the motor back in the water before July.
A marine shop might be the best option, as deep internal diagnosis requires proper equipment. That is because compression readings, VST fuel pressure testing, and cylinder head work all demand tools most recreational boaters simply don’t own.
Next fall, fog the engine properly. Run stabilized fuel through the carburetor or injectors for a full minute at the end of the last trip of the season. Coat those internal surfaces before the cold hits. It sounds tedious until you’re standing dockside in April watching everyone else head out while you wait for a tow to the marina. I’m apparently the person who learned that lesson the hard way — twice — before it actually stuck.


Stay in the loop
Get the latest nautical soundings updates delivered to your inbox.