Understanding Gelcoat Damage
Fiberglass boat repair has gotten complicated with all the different products, techniques, and conflicting advice flying around. As someone who’s fixed dozens of gelcoat cracks and blisters on my own boats, I learned everything there is to know about these repairs. Today, I will share it all with you.
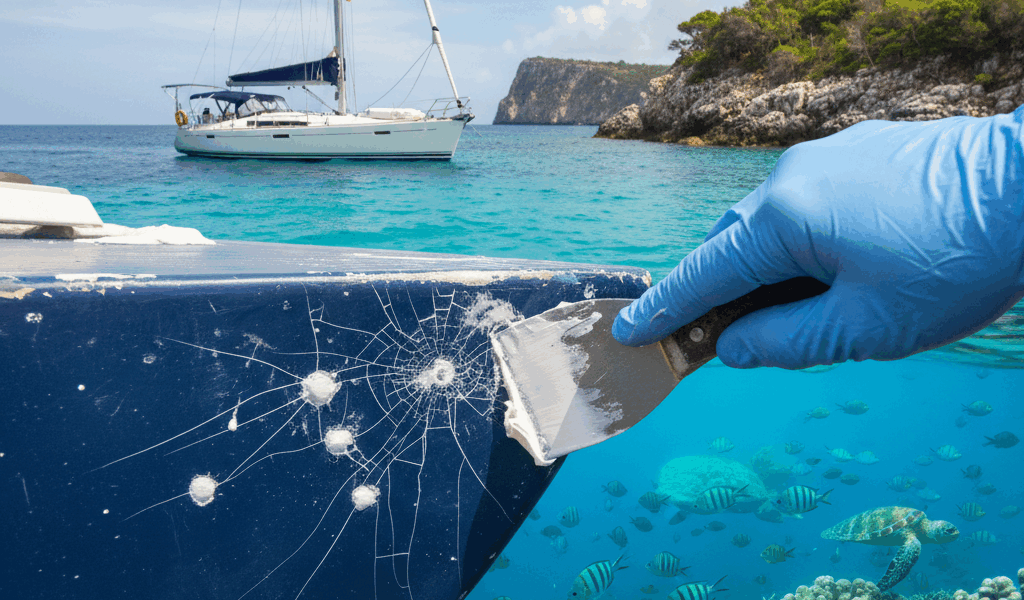
Gelcoat is the protective outer layer of your fiberglass boat, and when it develops cracks or blisters, you need to act quickly. These issues aren’t just cosmetic—they allow water to penetrate the underlying laminate, leading to more serious structural problems.
Gelcoat cracks typically appear as spider-web patterns (crazing) or single linear cracks. They occur due to impact, flexing, or age-related degradation. Osmotic blisters, on the other hand, form when water migrates through the gelcoat and reacts with uncured resins in the laminate, creating pockets of acidic fluid.
Tools and Materials You’ll Need
Before starting repairs, gather these essential supplies:
- Gelcoat repair paste (color-matched to your hull)
- 80-grit, 220-grit, and 400-grit wet/dry sandpaper
- Acetone and clean rags
- Plastic spreaders or putty knives
- Rotary tool with grinding bits (for blister repair)
- Epoxy filler (for deep blister repairs)
- PVA film or plastic wrap
- Rubbing compound and polish
Fixing Gelcoat Cracks: Step-by-Step
Probably should have led with this section, honestly.
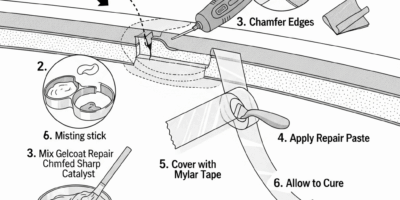
Step 1: Clean and Prep the Area
Wash the damaged area with soap and water, then wipe down with acetone to remove all wax, grease, and contaminants. Let it dry completely.
Step 2: Sand the Crack
Use 80-grit sandpaper to create a shallow V-groove along the crack, about 1/8 inch deep. Feather the edges outward 2-3 inches. That’s what makes this repair work for us boaters — the V-groove gives the repair paste something to grip.
Step 3: Apply Gelcoat Paste
Mix your color-matched gelcoat paste according to manufacturer directions. Apply it slightly proud of the surface using a plastic spreader, overfilling the crack by about 1/16 inch.
Step 4: Cover and Cure
Immediately cover the wet gelcoat with PVA film or tightly stretched plastic wrap. This prevents air exposure, which inhibits curing. Let it cure according to product instructions (usually 2-4 hours).
Step 5: Sand and Polish
Remove the film. Wet-sand with 220-grit, then 400-grit paper until flush with the surrounding surface. Finish with rubbing compound and polish to restore the shine.
Repairing Osmotic Blisters
Blister repair is more involved than crack filling because you must remove all contaminated material.
Grind Out the Blister
Use a rotary tool to grind away the blister and surrounding gelcoat, creating a shallow crater. Remove all discolored laminate—the bottom should show clean, dry fiberglass. Feather the edges at a 12:1 ratio.
Dry Thoroughly
This is critical. The cavity must be bone-dry before filling. In humid climates, this might take several days. Use a heat gun or hair dryer to speed the process, but avoid overheating. I learned this lesson the hard way after a repair that bubbled up again within months.
Fill with Epoxy
Apply marine-grade epoxy filler in thin layers, letting each layer cure before adding the next. Build up to just below the gelcoat surface level.
Apply Gelcoat and Finish
Once the epoxy is fully cured, apply gelcoat paste as described above for crack repairs. Sand and polish to blend.
When to Call a Professional
If you find extensive blister fields (more than 20-30 blisters), multiple deep cracks, or blisters below the waterline on a trailerable boat, consider professional help. Major blister problems may require complete barrier coat systems or even bottom stripping and re-lamination.
Prevention Tips
Prevent future damage by keeping your boat properly supported (avoiding hard spots), applying quality wax 2-3 times per season, and addressing small cracks immediately before they spread. For boats kept in the water year-round, consider applying an epoxy barrier coat to prevent osmotic blistering.
Regular inspection is your best defense. Check your hull every few months, especially after grounding incidents or hard impacts. Small repairs now prevent expensive problems later.

Stay in the loop
Get the latest nautical soundings updates delivered to your inbox.