Gelcoat Repair on a Boat — Step by Step for First-Timers
Boat gelcoat repair step by step — that’s the search that sent me down a three-hour rabbit hole the first time I stood in my driveway staring at a gouge on my 2003 Bayliner. The damage wasn’t catastrophic. A dock cleat had caught the hull during a rough landing, and now there was a chip about the size of a quarter, deep enough to show white fiberglass underneath the cream-colored gel. I figured I’d find a simple tutorial, knock it out in a weekend, and be done. What I actually found were guides written for people who already knew what MEKP was and had apparently repaired gelcoat approximately one thousand times before. This guide is not that. This is for the person standing in the boat aisle at West Marine with no idea what they’re holding, trying to figure out if they need paste or liquid and whether the $18 kit is a lie.
Spoiler: the $18 kit is kind of a lie. More on that in a minute.
What You Need Before You Start
The shopping list matters more than most tutorials admit. Getting to the hardware store mid-repair because you forgot PVA spray is genuinely terrible — gelcoat has a working window, and wasting it on a supply run will cost you the whole batch. Buy everything first. Here’s what you actually need.
Gelcoat — Paste vs Liquid
Gelcoat comes in two forms: paste (thickened) and liquid. For hull repairs on vertical or curved surfaces — which describes basically every surface on a boat — paste is the right call. Liquid gelcoat runs. It’s intended for large flat horizontal layup work in a shop. If you’re doing spot repair on a trailer boat in your driveway, buy the paste. I made the mistake of buying liquid for my first attempt because the hardware store was out of paste and I didn’t want to wait. It sagged off the repair within 90 seconds. Total waste.
Good brands for small repairs: Evercoat Polyester Gelcoat Paste (around $22 for a small can), TotalBoat Gelcoat (comes in both formulations, clearly labeled), or the Interlux option if your boat is Interlux-finished. Buy more than you think you need. A quarter-sized chip will use less than you’d imagine, but color matching tests eat material fast.
MEKP Catalyst — The Ratio That Matters
MEKP stands for methyl ethyl ketone peroxide. It’s the hardener that activates the gelcoat. The standard mix ratio is 1% to 2% by weight. At 70°F, 1.5% gives you roughly a 10-to-15-minute working window before the gelcoat starts gelling. Go above 2% and it kicks faster than you can work. Go below 1% and it may not fully cure — or worse, it cures but stays slightly tacky forever because of air inhibition issues (which we’ll cover).
Use a proper graduated mixing cup and a kitchen scale if you have one. I used eyeballing the first time. Don’t eyeball it. 1.5% of 20 grams of gelcoat paste is 0.3 grams of MEKP — tiny. A few extra drops in either direction changes the entire cure behavior. Most gelcoat kits include a small vial of MEKP; if yours doesn’t, buy it separately. It’s about $6 for a small bottle at any marine supply store.
Color Matching — The Part Everyone Underestimates
Color matching is the part of this job that determines whether your repair is invisible or whether it looks like a patch. Old gelcoat oxidizes and fades. Even if you find an exact formula match from your manufacturer, it won’t look right because your surrounding hull isn’t the original color anymore — it’s years of UV-faded version of that color.
The real approach: use universal pigment tints to dial in the shade. Buy a small set — Star Brite makes a decent universal pigment kit. Mix white gelcoat paste with small amounts of yellow, brown, gray, or whatever gets you close. Test on a white piece of cardboard, let it cure, then hold it against the hull in natural daylight. Not indoor light. Natural daylight only. Colors shift dramatically between the two. Plan on mixing three or four test batches before you get close enough. Budget time for this step — it took me 45 minutes just for color matching on a cream hull.
Sandpaper and Other Supplies
- Wet/dry sandpaper: 220, 320, 400, 600 grit (buy multiples of each)
- PVA mold release spray OR Saran Wrap — for curing (critical, explained below)
- Acetone — a full quart, not a tiny can
- Clean cotton rags, not paper towels
- A Dremel rotary tool with a small grinding bit
- Mixing sticks and small plastic cups
- Marine polish — 3M Perfect-It or Meguiar’s M67 Marine Polish
- Painter’s tape
- Nitrile gloves — MEKP is genuinely nasty on skin
The $18 kit from the discount shelf typically includes a tiny tube of mixed gelcoat with pre-mixed hardener and no instructions about air inhibition. That’s why I called it a lie. Not useless — just incomplete for a real repair.
Surface Prep — The Step Most People Rush
Probably should have opened with this section, honestly, because surface prep is where first-timers fail. Not the mixing. Not the application. The prep. If you rush it, the gelcoat won’t bond. Full stop.
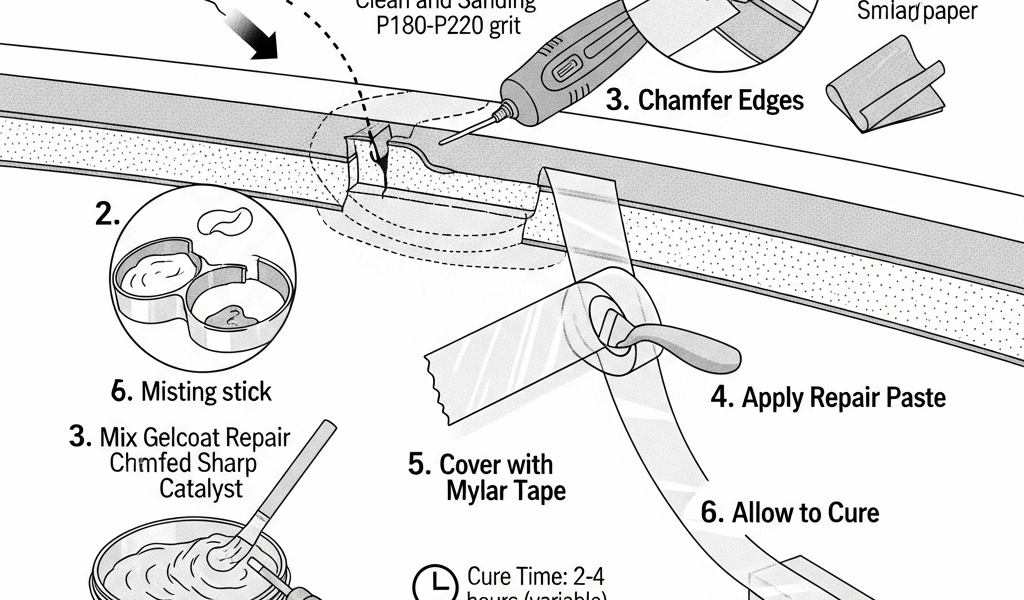
Opening the Damage with a Dremel
Counter-intuitive truth: you need to make the damage bigger before you can fix it. Gelcoat paste needs mechanical tooth to grip. A hairline crack with smooth walls won’t hold a repair — the new gelcoat will pop right back out in a season or two. Use a Dremel with a small carbide burr or grinding stone to open any cracks into a slight V-shape. For chips, undercut the edges slightly so the new gelcoat has something to lock under. This sounds extreme. It’s not. You’re already fixing it — doing this step right means fixing it once.
Work slowly. The goal is a rough, slightly flared cavity, not a huge hole. Wipe away all dust with a dry rag after grinding.
Wax Removal — The Silent Repair Killer
Wax prevents gelcoat from bonding. Even a thin layer of wax residue — left over from your last hull detail — will cause the repair to fail. You need to strip wax from an area approximately twice the diameter of the damage. So for a quarter-sized chip, strip wax from an area about the size of a softball.
Use acetone on a clean cotton rag. Wipe in one direction — don’t scrub in circles, which just redistributes the wax. Use a fresh section of rag for each wipe. Wipe the area twice, letting it flash dry between passes. Acetone evaporates fast at room temperature so this only takes a few minutes. Don’t use lacquer thinner or mineral spirits — they leave residue. Acetone only.
Final Clean Before Application
After wax removal, one more acetone wipe right before you apply. Let it flash off completely — about two minutes in normal air. The surface should be bone dry. Any moisture or solvent residue left behind will interfere with the cure. This last wipe is the step people skip because they’re impatient to start mixing. Don’t skip it.
Tape off the surrounding area with painter’s tape now, leaving about a 2mm border around the repair. You’ll sand that border later, but the tape keeps wet gelcoat off your polished hull while you work.
Mixing, Applying, and Curing
Temperature matters more than most people realize. Below 65°F, MEKP doesn’t catalyze reliably and you can end up with a gummy, never-fully-cured mess. Above 85°F, the working time shrinks dramatically — sometimes down to five minutes. The ideal range is 65°F to 80°F. If you’re working in summer heat, work in the morning. If your garage is cold, space heater for an hour before you start, then turn it off before mixing.
Mixing the Gelcoat
Measure your gelcoat paste by weight into a plastic mixing cup. For a small repair, 15 to 20 grams is usually plenty. Add your MEKP at 1.5% — so 0.225 to 0.3 grams. Mix thoroughly for two full minutes using a mixing stick. Scrape the sides and bottom of the cup as you go. Unmixed MEKP sitting at the edges of the cup means uneven cure.
Add any color pigments now if you’re tinting. Mix those in before you add MEKP, actually — getting the color right in plain gelcoat paste is easier, then you catalyst the final color. Once MEKP goes in, your clock starts. You have about 10 to 15 minutes at 70°F.
Application — Overfill on Purpose
Apply the mixed gelcoat into the repair with a small plastic spreader or even a popsicle stick. Press firmly to eliminate air pockets at the bottom of the cavity. Then overfill the repair — deliberately build it slightly proud of the surrounding surface. Gelcoat shrinks about 5% to 7% as it cures. If you fill it flush, it will cure below flush, and you’ll have a visible depression. Overfill by 1 to 2mm. You’ll sand it flat later.
Air Inhibition — The Problem Nobody Explains
Here’s the thing that makes gelcoat fundamentally different from most other repair materials: it will not cure properly when exposed to air. The surface remains permanently tacky. This isn’t a bad batch. It’s not user error in mixing. It’s just how polyester gelcoat works — oxygen at the surface inhibits the free radical cure reaction.
You need to seal it from air immediately after application. Two ways to do this:
- PVA spray — Polyvinyl alcohol, sold as “PVA mold release” at most marine stores (about $12 a can). Mist a light coat over the wet gelcoat. It forms a thin film that blocks air. The gelcoat cures properly beneath it. After cure, the PVA peels or washes off with water.
- Plastic wrap — Lay a piece of Saran Wrap directly over the wet repair and smooth it down. Eliminates air contact. Works surprisingly well for flat or gently curved surfaces. Harder on compound curves.
Frustrated by a tacky repair that had been sitting for 24 hours, I finally looked up why it wasn’t hardening and discovered I’d skipped this step entirely on my first attempt. Had to grind it all out and start over. PVA spray is now the first thing I buy.
Let the repair cure fully — minimum 4 hours at 70°F, ideally overnight. Don’t rush this. The gelcoat needs to reach full hardness before you sand it, or you’ll just drag gummy material around and ruin the surface.
Wet Sanding and Polishing to Invisible
The repair is cured. It’s hard. It’s also a lumpy, slightly shiny mound sitting proud of your hull. This is normal. The finishing process is what makes it disappear — and it’s mostly just patience and the right sequence of grits.
Wet Sanding — Work the Grits in Order
Fill a bucket with clean water. You’ll be wet sanding throughout, keeping the paper and surface lubricated constantly. Dry sanding gelcoat creates heat that melts the surface and loads the paper instantly. Always wet.
Start with 220 grit. The goal here is just to knock down the high spot — the overfilled mound — to roughly flush with the surrounding hull. Keep your strokes flat and even. Check frequently by feel. You’re not trying to blend yet, just level.
Move to 320 when the repair is flush. This grit starts removing the deep scratches from 220 and begins to refine the surface. Sand in a slightly larger area than the repair itself — feathering out about an inch past the edges.
Move to 400. The surface should start looking uniformly hazy now, no obvious deep scratches.
Finish with 600. At this point the surface should feel smooth to the fingertip with no ridges, and look uniformly dull white-gray. The repair edges should blend into the surrounding hull without a hard line you can feel. If you can still feel a ridge, keep going with 600.
Polishing — Where the Repair Actually Disappears
After 600 grit, you have a smooth but hazy surface. Polish brings back the gloss. Use a dedicated marine polish like 3M Perfect-It Gelcoat Polish (about $18 for a quart) or Meguiar’s M67. Apply by hand with a clean foam applicator pad or use a random orbital polisher at low speed if you have one.
Work in small circles, medium pressure, feathering out well past the repair edges. The haze will start clearing after 30 to 60 seconds of work. Wipe off with a clean microfiber. Step back. Look at it in natural light, from multiple angles.
When the Repair Is Actually Done
Here’s the distinction most guides skip: a repair looks done before it is done. Right after polishing, the fresh gelcoat will be glossier than the surrounding oxidized hull — it’ll stand out as too shiny. That’s not failure. That’s just new gelcoat next to old gelcoat. Give it a few weeks of sun exposure to blend. Or — better — use a light cutting compound on the surrounding area to bring it up slightly, then reapply polish to everything. The repair disappears faster this way.
What you should not do is wax the repair immediately. New gelcoat needs 30 days to fully off-gas before you apply wax. Waxing too early traps solvents in the surface and causes premature yellowing. Wait the 30 days. Then wax the whole hull at once and it will look factory.
The whole job — prep, application, curing overnight, sanding and polishing the next day — takes two short sessions and costs roughly $60 to $80 in materials for a small repair. Shops charge $150 to $300 for the same job, often more. The first repair takes longer because you’re learning the steps. The second one takes half the time. By the third, you’ll be the person other boat owners text when they dent something at the dock.


Stay in the loop
Get the latest nautical soundings updates delivered to your inbox.