How a Bilge Pump System Actually Works
Bilge pump troubleshooting has gotten complicated with all the conflicting advice flying around. As someone who’s spent way too many weekends elbow-deep in bilge water, I learned everything there is to know about this subject. Today, I will share it all with you.
But what is a bilge pump system, really? In essence, it’s a battery-powered circuit that automatically removes water from the lowest point of your hull. But it’s much more than that — it’s the one thing standing between your boat and a very bad afternoon. Water rises, triggers a float switch, completes a circuit, and an impeller pushes water overboard through a discharge hose. The whole thing runs without you touching anything. Which is exactly why you notice the second it quits. Dead silence where there should be a hum.
Four components can fail here: the float switch, the wiring harness, the fuse or breaker, and the pump motor itself. Most boaters immediately replace the pump. Expensive mistake. Wrong 70% of the time, honestly. I replaced a $300 pump on a 28-foot cabin cruiser after a bilge alarm went quiet during a dock storm — turned out the float switch had corroded solid. The pump was fine. Don’t make my mistake.
Understanding the flow — battery to fuse to switch to pump — means you can isolate and test each component instead of just throwing money at the problem.
Start Here — Check the Obvious Stuff First
Seriously. Eliminate the embarrassingly simple causes before you touch anything else. A blown fuse or a dead battery kills more bilge pumps than actual pump failures.
- Check the battery voltage. Set a multimeter to DC volts. Red probe on the positive post, black on negative. You need at least 12.0 volts — anything under 10.5 and the battery is done. Charge it first. Retest after.
- Hunt down the fuse or breaker. Your electrical panel should have the bilge pump circuit labeled pretty clearly. Breaker? Flip it OFF, then back ON. Fuse? Pull it and look at the filament. Blackened or snapped means it’s blown — replace it with the exact same amperage rating, typically 15 or 20 amp. Never upsize a fuse to force a struggling circuit to work. That’s how boats burn.
- Confirm the switch isn’t just OFF. Probably should have opened with this section, honestly. I spent 20 minutes diagnosing a pump on a friend’s boat before his teenage daughter walked over and mentioned she’d switched it off. Walk to the pump. Look at the toggle mounted on top or along the wiring harness. Check it’s not sitting in the OFF position.
- Load-test the battery. Manually activate the bilge pump while watching your multimeter. Voltage should hold above 11.5 volts while the pump runs. Drops below 10 volts? Your battery or the cable connections are failing under load.
Still nothing? Good — you’ve ruled out the easy wins. Keep going.
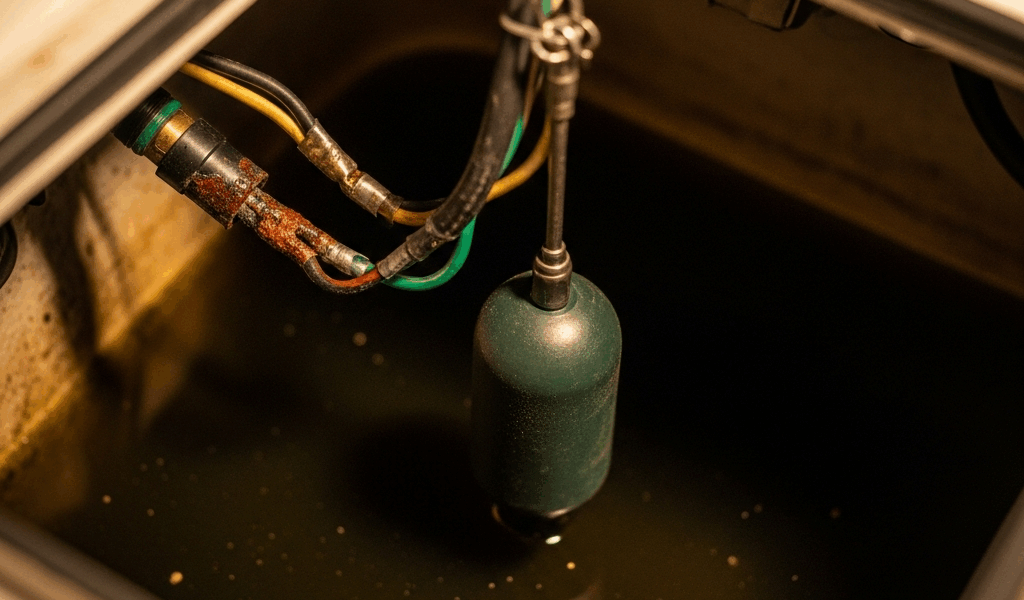
Testing the Float Switch Step by Step
The float switch fails more often than any other part in the system. It lives in dirty water, corrodes, collects debris, and eventually sticks in one position. When it sticks, the pump never gets the signal. That’s what makes this component so frustrating to us boaters — it looks completely fine sitting there.
So, without further ado, let’s dive in. Testing it means jumping the terminals — bypassing the switch entirely to find out whether the pump runs without it.
The Bypass Test
- Find the float switch wiring. Two wires connect it into the circuit — often white and black, or white and red depending on the manufacturer.
- Disconnect one wire from the switch terminal. Grab a short scrap of 16-gauge marine-grade wire and bridge both terminals directly. You’ve just cut the switch out of the circuit entirely.
- Turn the boat’s electrical system on and set the bilge pump switch to ON.
- Listen. Pump running? Float switch is your culprit — replace it. Still nothing? Power isn’t reaching the pump itself. Move on to the wiring section below.
I picked up this test from a crusty marine mechanic outside Beaufort who flatly refused to replace any part without proof it was dead first. Saved me thousands in unnecessary parts over a decade of boating.
Testing Switch Continuity (If You Have a Multimeter)
Set your multimeter to continuity — the setting that beeps — or to resistance. Touch one probe to each terminal on the float switch. Float arm UP should give you continuity, meaning a beep or near-zero resistance reading. Float arm DOWN should show nothing. No continuity in either position means the switch has failed internally.
Salt and brackish water corrode the contacts. Algae, sediment, and fuel grime wedge the float arm in place. White vinegar and a soft brush can sometimes clean it back to life — I’m apparently saltier on my boat than I think, and that vinegar trick works for me while replacement sometimes never even crosses my mind until the third failure. Try cleaning first if the switch is less than a season old. But replacement is the reliable fix. A decent Attwood or Rule float switch runs about $15 to $25. Not worth fighting a corroded one forever.
When the Pump Gets Power but Still Won’t Run
Your bypass test confirmed power is reaching the pump terminals. The pump should be running. It isn’t.
Three things jam a pump: blocked intake or discharge, a corroded or seized motor, a bent impeller. Usually one of those three.
Remove and Inspect
- Kill power at the breaker or fuse first. Every time. Non-negotiable.
- Loosen the discharge hose clamp with pliers and pull the hose back. Have a bucket — there’s always residual water inside, usually more than you expect.
- Pull the mounting bolts. Most bilge pumps bolt directly to the bilge floor. Lift the pump up carefully.
- Check the intake screen — the small mesh cage at the bottom of the unit. Pull it off. Hair, sediment, fiberglass flakes, and mystery gunk love to pack in here. Old toothbrush under fresh water clears it fast.
- Shine a flashlight into the pump opening itself. Visible debris? A wad of cloth? Plastic bag fragment? These things find their way in. Pull it out with needle-nose pliers.
- Try spinning the impeller by hand. Should rotate freely with almost no resistance. Completely frozen means the motor is seized. Rough and gritty means corrosion. Soak the whole pump in white vinegar for 24 hours, then work the impeller back and forth gently with your fingers. I’ve revived several pumps this way after winter storage — Rule 1100 GPH models seem especially responsive to it. But if it won’t free up after soaking, replacement is the right call. New pumps run $80 to $250 depending on GPH rating and whether you want automatic or manual.
Wiring Problems That Kill Bilge Pumps Silently
This is where most troubleshooting guides stop paying attention. Bad wiring kills more bilge pump systems than bad pumps — it’s not even close.
Corroded ring terminals block current flow at the pump connections. Undersized wire creates resistance — power arrives at the pump, just not enough to spin the motor properly. A loose or corroded ground connection starves the whole circuit. The pump tests fine on a shop bench. Then it fails in the bilge because voltage collapses under real load. That’s because wire gauge and terminal quality matter enormously once a motor is actually drawing current.
The Voltage Drop Test
This one separates people who actually fix bilge pumps from people who just read about fixing them.
- Turn the pump ON manually — or use your bypass wire from the float switch test.
- While the pump is running, touch your multimeter probes directly to the positive and negative terminals on the pump body itself. Write down that voltage.
- Simultaneously measure voltage at the battery terminals. Two meters makes this easier. One person, one meter — measure at the pump first, then immediately at the battery without turning anything off.
- Subtract. Under 0.5 volts of difference is acceptable. Over 1.0 volt of drop means the wiring is robbing the pump of power.
Walk the wiring path visually. Green or white crusty buildup on terminals means active corrosion — clean it with a terminal brush or 220-grit sandpaper. Check the ground wire specifically. It should run directly to bare metal on the engine block or the battery’s ground lug. Not through a switch. Not through a fuse. Directly.
Undersized wire needs replacing, full stop. Pumps over 1,000 GPH — your Rule 1500 or Attwood Tsunami T800 territory — need 8 or 10 gauge wire. Not 12 gauge. Check the nameplate stamped on the pump housing or dig out the manual if you still have it.
Wiring fixes are tedious. Crawling around in a bilge with a heat gun and a bag of marine-grade terminals isn’t anyone’s idea of a good Saturday. But it works. And a $30 wiring repair beats a $200 pump replacement every single time.


Stay in the loop
Get the latest nautical soundings updates delivered to your inbox.